
Using Technology in the Classroom
Teaching Teachers How to Incorporate Technology into Their Classrooms
Animoto.
Transforming photos and music into video slideshows.
Time to tell your story with more than just words.
Need an easy and fun way to turn pictures, text, and video clips into a movie? Animoto allows you to drop your media easily into an ordered story that can have music added to make telling your story more interesting than just a slideshow. Students can produce their own videos to discuss a topic or present their research with ease.
How-To Create an Animoto Video

Step 1. Register for an Account
Registering for an account is free! Animoto Lite is the free option that allows you to make 30 seconds videos. Upgrading to Plus provides you with more pictures and the ability to produce longer videos.

Step 2. Creating an Animoto and Getting Started
To create a new Animoto video, click CREATE. You will be prompted to pick a style. You can browse by category and preview the different themes. Some themes are only available by upgrading but there are still plenty of free themes. Once you have selected the theme that you think is best for you video, click CREATE VIDEO to start adding media.

Step 3. Adding Pictures, Videos, Text, and Music
It is now time to start adding media to your video! To add pictures and video click ADD PICS & VIDS. You can upload pictures and videos from your computer, Facebook, Instagram, Dropbox, Picasa, Flickr, or SmugMug. You can also add images and videos clips from the Animoto Library.
Want to put in a title slide or a transition text? Click ADD TEXT and you add 40 characters worth of a title or 50 characters of a subtitle.
Each theme comes with preset music but that can easily be changed! Clicking on the music bar allows you to change the music by selecting music from one of Animoto's many playlists or uploading a song of your own. You can also trim the song or adjust the picture speed of your video using the music setting bar.
Step 4. Editing and Organize you Media
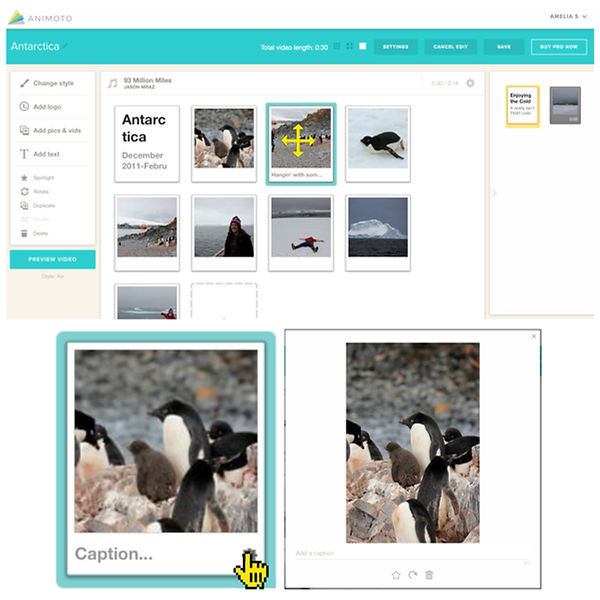
Once you have added your different types of media, you can organize them in the order that you think is best. To do this, all you have to do is click and select the photo or video you would like to move and simple drag and drop it into place where you would like it.
You can also add captions to your photos that will appear in your video. To do this, click on the botton right of the image to view the image settings. This will bring you to a photo editing box that will allow you to add a caption to your photo!

Step 5. Preview and Produce
Now that you have selected and inserted your media and you think you are done you need to actually create your video. Click the PREVIEW VIDEO button to preview your movie. If you like how your video is, you can select to produce it. If you would like to make changes go back to continue editing.
Don't forget to give your video a title. If you choose, you may also give your video a date and provide a description.

Step 6. Share
Now that you have produced your Animoto video, you can share it! Your video can be shared through email, Facebook, Twitter, Youtube, Pinteret, WordPress, Tumblr, Blogger, Vimeo, Wistia, Smugmug, LinkendIn, and vzaar. You can also obtain the link or embed your video!