
Using Technology in the Classroom
Teaching Teachers How to Incorporate Technology into Their Classrooms
Blendspace.
Engage your classroom and blend your lessons.
Start blending up the facts and see your story in style!
Give your lessons a new and exciting twist! Or have your students create their own lessons to share and teach their fellow classmates. Blendspace allows you to import resources from across the web to let your students explore a subject through videos, photos, websites, and educational resources. You can even build in quizzes to see what your students have learned!
How-To Create a Blendspace

Step 1. Get Started
Get started by either signing up for a Blendspace account. If you already have one, login.

Step 2. Set Up a Class
Setting up a class allows your students to see the lessons you develop. It also allows you to organize your students and allow them to have access to specific lessons for specific topics.
To set up a class, click the CLASSES button on the left hand side. Next select the grade level from the drop down menu and give you class a name. Add the class. From here you will need to give your students the access code that Blendspace provides and they can join their class!

Step 3. Create a Lesson
Now it is time to create a lesson. Simply click the NEW LESSON button. You will then be prompted to five you lesson a name. Simply type in the topic, subject, or the specific name of the lesson you are building.
Step 4. Add Resources
Now that you've created a new lesson, you will want to add resources. There are a myriad of types of resources that can be added to a Blendspace lesson.
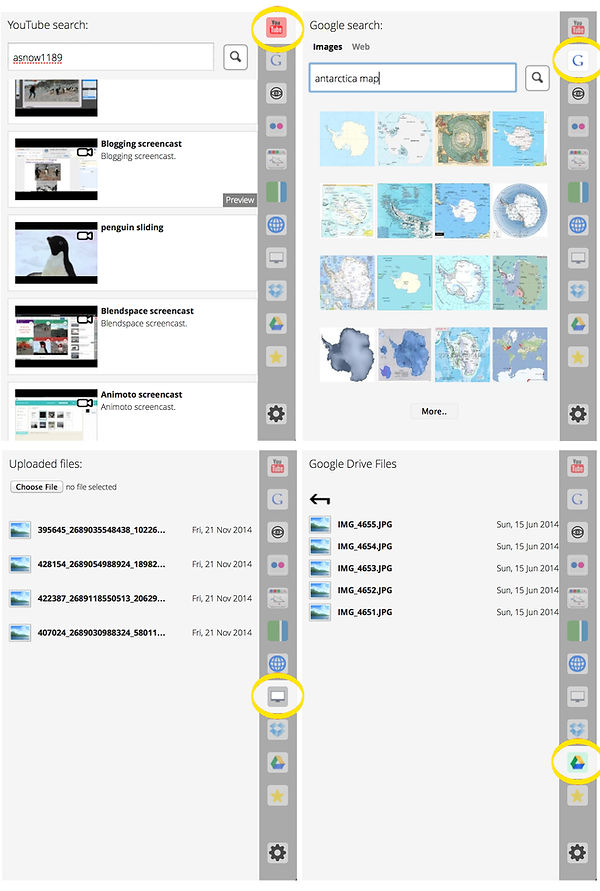
By clicking on the toolbox on the right hand side, you will be provided with a variety of options for finding and selecting resources. You can search and insert YouTube Videos, images and webpages through Google, resources from OpenEd, images from Flickr, videos from Educreations, resources from Gooru, website link or embeded code, upload files from your own computer, add files from your Dropbox, insert items from your Google Drive, or add something you have bookmarked while searching the web. Simple click on the resource you would like to add and drag and drop it into a empty box in your lesson. You can quickly and easily move and re-organize your resources as you go.

Step 5. Enter Notes and Descriptions
You can enter notes or descriptions on each picture or video. This is where you may want to add notes for your students on ideas that were left out or add a description so your students know exactly what they are looking at. You may just want to add a caption to each photo.

Step 6. Add Text or Quizzes
Adding title screens, transition screens, or text for any reason is simple and easy. Click the ADD TEXT button and a toolbox will appear where you can type and format the text you would like to insert.
You can also add quizzes to your lesson that will allow you to ask students multiple choice questions based on what was presented to them. By clicking ADD QUIZ you can type in questions and multiple choice answers. Make sure to select the bubble next to the correct answer so Blendspace and your students can track how they did. You can see the results through your homepage!

Step 7. Share
Now that you've created a new lesson, it is time to share it. You can select which students you would like to share the lesson with. You can also share the link through Edmodo, Twitter, Email, and Facebook. The link can be embed or you can even get a unique QR code for your lesson.
You can also change your privacy settings on your lesson to allow select people or groups of people to see your lesson and what resources can be copied from your lesson.
You may also want to collaborate with a fellow teacher or if your students are designing lessons, you may want them to collaborate. You are able to add Co-Authors through email or by sending the link to your chosen parties.